Pages

About Me

About Me
Welcome to my blog! I'm Sarah, an ambitious 23 year young cupcake snob and avid baker. I'm a lover of edgy designs and creative flavor pairings. Aside from being a baker I'm also a daughter, aunt, best friend, and momma to the cutest Scottish Terrier in the world.

Thursday, November 15, 2012

Fun with Fondant


Those of us who had a normal childhood probably remember Play Doh.  Remember the McDonald's kitchen set they had which molded that awful smelling stuff into Big Macs, fries, and sundaes to complete your totally inedible meal?  As a child Play Doh always frustrated me.  I was never any good at working with Play Doh and now, at 23, I'm trying to work with the big kid baker's version of it...fondant.

My reasons for not being the biggest fan of fondant are pretty simple:
1. Has anyone really ever tasted fondant?  It's disgusting!
2. Working with fondant is like trying to work with fly paper.  It sticks to EVERYTHING!
3. The combination of it tasting terrible and being so much work makes my head spin when I see people pick the fondant off their cupcake, set it aside, and throw it away.  My inner fat kid tells me if it doesn't taste good, if you can't eat it, it ain't worth it.
-HOWEVER-
Some people are willing to pay someone to slave over these kinds of things so people "Oooh" and "Aaah" over them for three seconds before shoving out of the way to wolf down a cupcake.  In that case, I'll gladly slave over these for you!  One of my co worker's friends, a soon to be bride, wanted to do exactly that. 
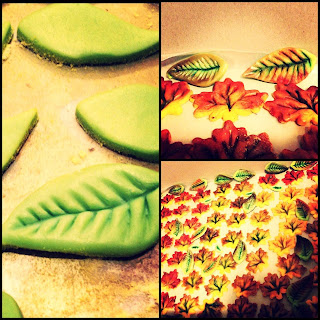
She said she wanted maple leafs atop each of her 60 cupcakes using two fall colors to differentiate her two flavors of cupcakes.  It sounded simple and elegant.  Piece of cake!  I ordered myself a maple leaf cut out and punch which allowed me to either simply cut out the shape or push the plunger down into the fondant while cutting for a "spined" look.  Simple.
BUT...there's always a but.

Two days before the wedding she sent me an e-mail with this image:

I'm sorry if I sound like a Whinetta or a Moana, but these are not simple, one color leafs.  These look like something that came from my back yard!  So I thought I'd just do my best to give her what she wanted.  Immediately after making that decision, I changed my policy: No changes to orders within 1 week of the delivery date.

So I got to work on these puppies right away.  Luckily JoAnn Fabric had leaf cookie cutters in the shape of the green one shown as well as numerous colors of Wilton color dust.  However it didn't have the spines.  I made my fondant, colored both batches, and began the rolling and cutting
process. I then started spining with a toothpick.  The leafs above we done with a mold or a press so because I didn't have those kinds of tools mine didn't turn out quite as realistic.  I was pretty proud of myself though.  I made green and yellow leafs, which I colored with the dust.  The finished product was a fun mix between simple and realistic.  Once all 120 pieces were colored and spined I finished them off with a little shimmer dust.  I started this process two days before the wedding and allowed them to sit in a bakery box for those two days to set.  *NOTE: Dust a little powdered sugar on everything you will be setting fondant on, including wax paper, or you will have a nightmare of a time trying to get pieces off of the paper in one piece!*

All in all I believe the cupcakes were a success.  Given the short notice I had to nail down a technique I wasn't really sure I even had I felt like I had won this battle with fondant.  I also believe I made even more beautiful creations with my fondant nightmare than I could have ever imagines with Play Doh.  Maybe fondant just lets us big little kids have a second change at sculpting and creativity, minus that terrible smell.

Perhaps my lesson in fondant and last minute panic really wasn't a lesson in baking culinary crisis at all.  Moments like these, where a situation just kind of blows up in your face and catches you flat footed as opposed to on your toes, really make your true inner you shine.  You either take it head on or accept defeat.  Sometimes folding is the easier option of the two but in the cook book of life a hard earned victory is much, much sweeter than defeat.

Monday, November 12, 2012

The Secret to Sensational Swirls!


Have you ever been stuck trying to pick just one color for your frosting?  And let's be honest, who said you could only pick one?  Christmas means red and green, Halloween is orange and black, and good old Fourth of July is the red, white, and blue.  So how can you make your cupcakes just as festive as the holidays you celebrate?  Swirled frosting!

The photo above shows the technique I swear by.  I used home made maple cream cheese frosting and Wilton gel colors in pink, teal, and violet for Easter.  Here's an easy step by step guide to multicolored, swirled frosting which will keep your colors from mixing together into an unsavory "baby poop green" sort of color.

Swirled Frosting
What you'll need: Light colored frosting of choice
                             At least two colors of food coloring
                             Separate bowls and spatulas for each color
                             One long piece of saran wrap
                             A clip, bread tie, or the ability to tie a knot
                             Your choice of piping bag and tip

Getting started: Start by dividing up your frosting evenly according to the number of colors you have.  If you are going to do multiple layers of the same color to give a different swirl pattern, tint your frosting to that color in one batch.  Give yourself plenty of room to work.  Lay out your saran wrap (remember, one long piece!) so that it is not too close to the edge of your counter or table top and so that it can't get snagged on anything.  Anchor one edge of your frosting down.  This anchored side is your end which will be twisted up and clipped to prevent your frosting from oozing out the back as you pipe. Naturally, the opposite edge left free will be your opening.  Have your piping bag within reach of your saran wrap.

Step 1: Color your frosting.  Use as little or as much coloring to achieve the shade of color you desire.  Use the spatula to mix the coloring in by hand, scraping down the sides of the bowl and moving the outer frosting to the middle of the bowl. 
Step 2: Starting with your darkest color first, carefully transfer your frosting to the saran wrap forming the frosting in a long, narrow line.  Be careful not to spread the frosting too wide.  Try to get your frosting close to the edge of the opening and keep end your frosting rectangle farther away from your end. 
Step 3: Repeat with each additional color, from darkest to lightest, one on top of the other.  Don't worry if some colors go over the edge of your frosting "pile", or if you can't spread a thick even layer across the length of your frosting run.  Just be sure that the end that is going to be your "opening" is evenly colored.
Step 4: Once all of your colors are layered in a rectangle on your saran wrap sheet, bring the sides of the saran wrap up to touch each other (hot dog style).  Carefully roll the ends together, forming a saran wrap tube of frosting. 
Step 5: Your end should be long enough to do one of three things: clip, twist and tie, or tie into a knot.  Twist the left over saran wrap at the end until the twist meets the back end of your frosting.  It is important to somehow secure the saran wrap so that your frosting can only go one way: forward.  I prefer tying the saran wrap, but it takes some patients and good coordination to keep the frosting from going all over your counter top or even worse, rolling off of it completely. 
Step 6:  Slide your tube, opening first, into your piping bag.  Try to mold the saran wrap tube as best you can to the shape of the bag, sending the tube deeper into the bag and preventing air pockets.  My favorite technique, though I should warn should really only be used if you are using a coupler and decorative tip, is to position my tube opening first at the edge of my counter.  I place my piping bag's opening at the lip of the counter against the cabinet.  I then push the tube forward to sort of free fall/launch into my bag and take the shape of the bag with the help of gravity.  Be careful though! Sometimes this will result in a little frosting on your foot.

I use this technique for so much more than just a few holidays here and there.  Birthdays, baby showers, and all sorts of gatherings are the perfect open invitation to give your frosting a swirl of color that friends, family, coworkers, guests, and clients are sure to "ooh" and "ahh" over.


Thursday, November 8, 2012

Shipping Something Sweet


A friend of mine in Philadelphia messaged me a few weeks ago wanting to use my cupcakes to send to clients of his as thank you gestures.  I was flattered, but didn't know the first thing about packaging such delicate perishables or shipping them in general.  After some hard thinking and a look at my supple I came up with a pretty solid plan of attack.  The cupcakes arrived from Chicago to Philadelphia in two days, intact, and delicious for a mere $16.00.

Shipping cupcakes
You will need:
A plastic cupcake container
Lollipop/cake pop sticks
1-2 ice packs
Aluminum foil
Bubble wrap
Shipping box
Sharpie or Fragile stickers
Tape


Step 1: After baking and frosting your cupcakes, place them in the plastic bakery container. Measure your lollipop/cake pop sticks to where the top and bottom will touch the floor and ceiling of the container.  Simply insert one stick into each cupcake and secure the lid.  You should be able to move the conainter around without any mess or movement.
Step 2: Freeze these babies overnight.
Step 3: On the shipment date, remove your cupcakes from the freezer.  Set out your aluminum foil, setting your ice pack in the center.  Place the bottom of the cupcake container on top of the ice pack and secure with rubber bands.  Wrap the entire bundle of ice pack and cupcake container in the aluminum foil, making sure all openings are "sealed".
Step 4: Lay bubble wrap in your box, allowing extra to lay over the edges and out of the box.  Carefully place your aluminum foil bundle into the box and nest the remaining bubble wrap aroung the package.  You should be able to close and seal the box without damaging the container and without a large bulge at either the top or bottom of the box.


TIPS:
1. Make sure your box is marked as FRAGILEDon't write the contents on the box or they may not reach their destination, as some postal workers get hungry and have been known to open boxes with baked goods and eat their contents.  Both of my parents worked for the postal service for more than 35 years.  Trust me, they know!
2. Take your items to the post office at the END of the day, about an hour before the post office closes.  This ensures your package will go out that night instead of sitting out all day had you taken it in in the morning.
3. Try to use flat rate, two day shipping.